学习笔记

1、升级到 Discuz! X3.4 主题分类颜色font不显示:
①打开source\function\function_forum.php文件,②找到第518行,
if($forum['threadtypes']['types']) {
    safefilter($forum['threadtypes']['types']);
}
修改为:
if($forum['threadtypes']['types']) {
    //safefilter($forum['threadtypes']['types']);
}2、Discuz管理中心登录的时闪退:
①打开config/config_global.php文件,找到以下这段代码,
$_config['admincp']['checkip'] = 1修改为:
$_config['admincp']['checkip'] = 0这段代码的意思是,是否检查管理员ip,1代表是,0代表否,将1改成0即可。
3、VPS一键BBR加速脚本:
wget "https://github.com/chiakge/Linux-NetSpeed/raw/master/tcp.sh" && chmod +x tcp.sh && ./tcp.sh4、V2ray/SS 一键搭建脚本:
bash <(curl -sL https://storage.googleapis.com/tiziblog/ss.sh)bash <(curl -s -L https://git.io/v2ray-setup.sh)5、iframe嵌入视频尺寸自适应设置:
<iframe id="video" src="https://v.qq.com/txp/iframe/player.html?vid=t0937smmsj5" width="100%" frameborder="0" allowfullscreen="allowfullscreen"></iframe>
<script type="text/javascript">document.getElementById("video").style.height=document.getElementById("video").scrollWidth*0.65+"px"</script>将宽度修改为100%,并为<iframe>增加了一个名为“video”的id号,并通过javascript将宽度和高度关联,即高度等于0.65倍的宽度。
6、VPS测试合集脚本:
① 脚本合集:
wget vpstest.cn/it && bash it或
wget git.io/vpstest && bash vpstest或
wget -O it vpstest.cn && bash it
② Bench.sh脚本:
wget -qO- bench.sh | bash③ superbench脚本(服务器基本信息与IO读写,国内三网下载测试 延迟脚本):
wget -qO- git.io/superbench.sh | bash④ superbench+欧美节点测速:
wget -qO- http://depot.treesky.link/speedtest/n/superbench_f.sh | bash⑤ 国外节点测速脚本:
curl -LsO bench.monster/speedtest.sh; bash speedtest.sh -Global⑥ 三网测速脚本:
bash <(curl -Lso- http://yun.789888.xyz/speedtest.sh) #推荐使用⑦ 上传下载速度单线程:
wget -qO- https://git.io/pigji.comSuperbench | bash
⑧ 回程测试脚本:
curl https://raw.githubusercontent.com/zhucaidan/mtr_trace/main/mtr_trace.sh|bash
或者
curl https://zhujiwiki.com/wp-content/uploads/2022/01/mtr_trace.sh|bash
⑨ 回程线路检测脚本:
curl http://tutu.ovh/bash/returnroute/test.sh|bash⑩ 硬盘读写及Geekbench 测试脚本:
curl -sL yabs.sh | bash -s -- -i⑪ Zbench(基于SuperBench,加入Ping以及路由测试的功能,还能生成测评报告,分享给其他人查看测评数据.加入了国内节点测速):
wget -N --no-check-certificate https://raw.githubusercontent.com/FunctionClub/ZBench/master/ZBench-CN.sh && bash ZBench-CN.sh⑫ 含IPV4 IPV6节点下载测试:
wget -qO- --no-check-certificate https://raw.githubusercontent.com/oooldking/script/master/superbench.sh | bash
⑬ 一键回程测试脚本(目前共有 8 个测试节点,分别是:广州电信,上海电信,厦门电信,重庆联通,四川联通,上海移动,成都移动,成都教育网):
wget -qO- git.io/besttrace | bash⑭ 一键测试四网回程脚本(测试服务器到我们指定节点IP的路由回程,或者脚本自带的四个节点回程,包括电信、联通、移动、教育网四网):
wget https://raw.githubusercontent.com/nanqinlang-script/testrace/master/testrace.sh
bash testrace.sh
⑮ LemonBench(一款针对Linux服务器设计的服务器性能测试工具。通过综合测试,可以快速评估服务器的综合性能,为使用者提供服务器硬件配置信息):
LemonBench快速测试命令:
wget -qO- http://ilemonra.in/LemonBenchIntl | bash -s fast
LemonBench完整测试命令:
wget -qO- http://ilemonra.in/LemonBenchIntl | bash -s full
⑯ UnixBench(测试项目有:系统调用、读写、进程、图形化测试、2D、3D、管道、运算、C库等系统基准性能提供测试数据,简单的对CPU进行运算测试,需要跑的时间很长,消耗比较大,有的时候VPS说不定跑着就自动断开了):
wget --no-check-certificate https://github.com/teddysun/across/raw/master/unixbench.sh
chmod +x unixbench.sh
./unixbench.sh
⑰ 流媒体检测脚本(主要测试IP能否解锁以下流媒体网站 Netflix | YouTube Region | DisneyPlus | Steam Currency | HBO Now | BBC | MyTVSuper | Now E | Viu TV | Bahamut Anime | BiliBili China Mainland Only | BiliBili Hongkong/Macau/Taiwan | Bilibili Taiwan Only | Abema.TV | Paravi | U Next | Hulu Japan | Princess Connect Re:Dive Japan | Pretty Derby Japan | Kancolle Japan | Dazn):
bash <(curl -sSL "https://github.com/CoiaPrant/MediaUnlock_Test/raw/main/check.sh")
或者
bash <(curl -L -s https://raw.githubusercontent.com/lmc999/RegionRestrictionCheck/main/check.sh)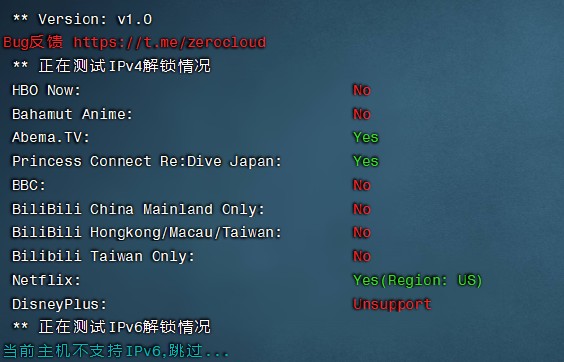
7、Microsoft Graph自定义修改应用密钥有效期:
- 修改应用密钥有效期之 Chrome 扩展 TamperDev 篇
- 修改应用密钥有效期之 Fiddler 篇
- 修改应用密钥有效期之 Charles 篇
- 修改应用密钥有效期之 azure-cli 篇
- 修改应用密钥有效期之 Graph Explorer 篇
8、Gbox软件源大全:
- GBox官方游戏源:
- http://game.gbox.plus/Public/Source.json
- 萝卜网官方软件源:
- https://www.margua.top/Public/Source.json
- An南拥夏栀官方软件源:
- https://nyxz166.cn/GBox/Source.json
- 旁门左道小一白官方软件源:
- https://hyczby.com/Public/Source.json
- ios黑科技软件源:
- https://s7aa.cn/Gbox/ioshkj.json
- 清风不识字GBox源:
- https://www.ttupp.com/gbox/666.json
- 少年歌行PRO软件收藏源:
- https://www.shao.gq/shao.json
- 奇心科技软件源:
- https://qxzy.top/sourec.json
- 美图源:
- http://znvs.club/Public/Meitu.json
- Mango源:
- https://www.iosapps.top/store.json
- 凌企源:
- http://lingqi69.xyz/Source.json
- 果仁:
- http://lingqi69.xyz/game/Source.json
systeminfo② 出厂日期查询
wmic bios get releasedate③ 序列号查询
wmic bios get serialnumber④ 内存条信息查询(频率/型号)
wmic memorychip⑤ 关机(定时)/重启(定时)/取消关机
shutdown -s -t 100
shutdown -r -t 100
shutdown -a
⑥ 查询本地ip信息
ipconfig ⑦ 查询端口占用情况
netstat⑧ 查询端口对应程序pid
netstat -aon|findstr "****"⑨ 关闭对应端口程序
taskkill /pid **** -t -f10、Google Pixel 重置方法(恢复出厂设置之前,没有退出Google账户,导致wlan连接不上互联网,进行不到下一步的问题):
- 按住电源键并选择关机。如果屏幕处于无响应状态,那就按住电源键几秒钟,直到设备关闭。
- 按住电源键和音量-,随后屏幕上应该会出现躺着的Android机器人,设备的相关信息,以及屏幕顶部的开始按钮。
- 浏览菜单选项可以通过音量+和音量-来实现,电源键用于进行选择。按下音量-两次,你应该就会在屏幕右上方看到红色的恢复模式,然后按下电源键选定即可。
- 随后,白色的谷歌logo便会弹出,紧接着是Android机器人,其下方还会显示“No Command”字样。
- 按住电源键和音量+约三秒钟,然后放开音量+。
- 这时屏幕顶部应该就会显示出Android系统恢复选项,然后你可以通过音量键来选择自己需要的选项,并使用电源键确认。
11、电报代理MTProxy搭建:
安装必要的开发库
apt install build-essential libssl-dev zlib1g-dev一键安装MTProxy脚本
wget -N --no-check-certificate https://raw.githubusercontent.com/ToyoDAdoubiBackup/doubi/master/mtproxy.sh && chmod +x mtproxy.sh && bash mtproxy.sh12、Linux防火墙放行指定端口:
【Debian/Ubuntu】
①安装iptables(通常系统都会自带,如果没有就需要安装)
apt-get update
apt-get install iptables②放行指定端口,如:8888
iptables -I INPUT -p tcp --dport 8888 -j ACCEPT③然后保存放行规则
iptables-save完成后已经放行了指定的端口,但重启后会失效,下面设置自动生效规则
④安装iptables-persistent
apt-get install iptables-persistent⑤保存规则自动生效
netfilter-persistent save
netfilter-persistent reload【Centos】
①放行指定端口,如:8888
firewall-cmd --zone=public --add-port=8888/tcp --permanent②命令含义
--zone                      #作用域
--add-port=80/tcp  #添加端口,格式为:端口/通讯协议
--permanent           #永久生效,没有此参数重启后失效
③重启防火墙
firewall-cmd --reload
【一键查看防火墙规则】
iptables -L13、多功能脚本推荐(包含一键DD包):
wget -N --no-check-certificate https://raw.githubusercontent.com/veip007/hj/master/hj.sh && chmod +x hj.sh && bash hj.sh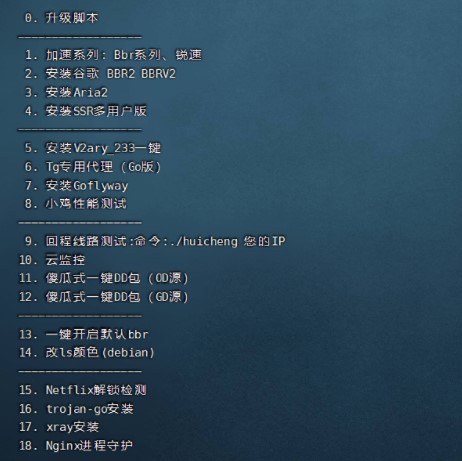
14、一键 GOST 脚本:
wget --no-check-certificate -O gost.sh https://raw.githubusercontent.com/KANIKIG/Multi-EasyGost/master/gost.sh && chmod +x gost.sh && ./gost.sh
15、X-ui 一键搭建脚本:
bash <(curl -Ls https://raw.githubusercontent.com/vaxilu/x-ui/master/install.sh)
调出管理面板
x-ui16、宝塔面板 & AApanel(Debian):
#AApanel
wget -O install.sh http://www.aapanel.com/script/install-ubuntu_6.0_en.sh && bash install.sh
#宝塔
wget -O install.sh http://download.bt.cn/install/install-ubuntu_6.0.sh && bash install.sh17、哪吒探针:
curl -L https://raw.githubusercontent.com/naiba/nezha/master/script/install.sh  -o nezha.sh && chmod +x nezha.sh
sudo ./nezha.sh18、IPV6 DNS解析(可访问IPV4及下载IPV资源):
echo -e "nameserver 2001:67c:2b0::4\nnameserver 2001:67c:2b0::6" > /etc/resolv.conf19、Aria2一键脚本
wget -N git.io/aria2.sh && chmod +x aria2.sh
./aria2.sh20、本地数据库导入Docker
docker cp xxx.sql mysql:/root/
docker exec -it mysql bash
# 登录或者直接导入

mysql -uroot -p
use xxx; #选择数据库
source /root/xxx.sql # 导入数据21、一键添加/删除 Swap虚拟内存
wget https://www.moerats.com/usr/shell/swap.sh && bash swap.sh22、一键搭建MTProto
bash <(curl -sL https://22.vin/jb/tg/tg.sh)23、一键搭建WARP(为服务器添加IPv4/IPv6网络)
wget -N https://raw.githubusercontent.com/fscarmen/warp/main/menu.sh && bash menu.sh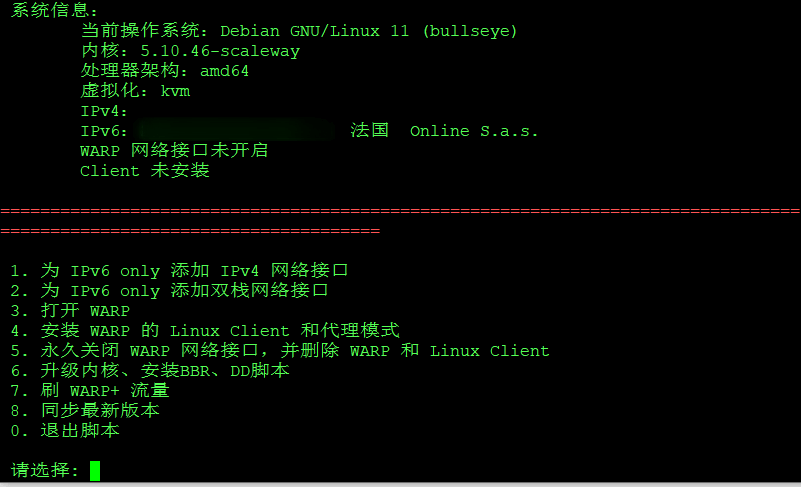

24、Typecho后台报错(Deprecated: Function get_magic_quotes_gpc() is deprecated in /www/wwwroot/******/var/Typecho/Common.php on line 208)解决
提示表示:不推荐使用get_magic_quotes_gpc函数,禁用即可,宝塔面板中在php设置——禁用函数,添加get_magic_quotes_gpc,然后重启php类似问题可在程序入口位置或者报错文件开头添加如下代码:
define('MAGIC_QUOTES_GPC',ini_set("magic_quotes_runtime",0)?True:False);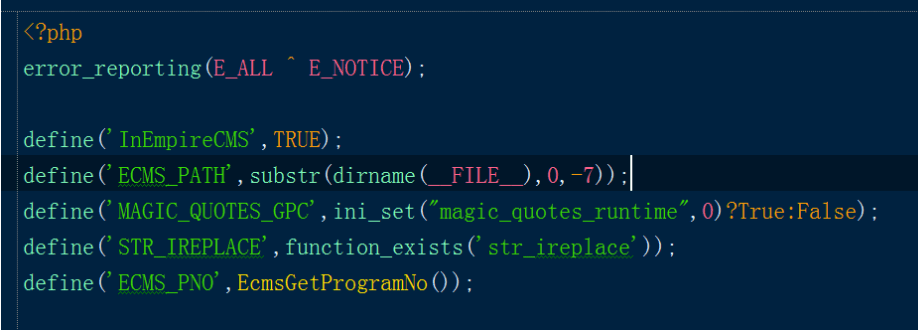
25、多功能8合1一键脚本(v2ray-agent)
wget -P /root -N --no-check-certificate "https://raw.githubusercontent.com/mack-a/v2ray-agent/master/install.sh" && chmod 700 /root/install.sh && /root/install.sh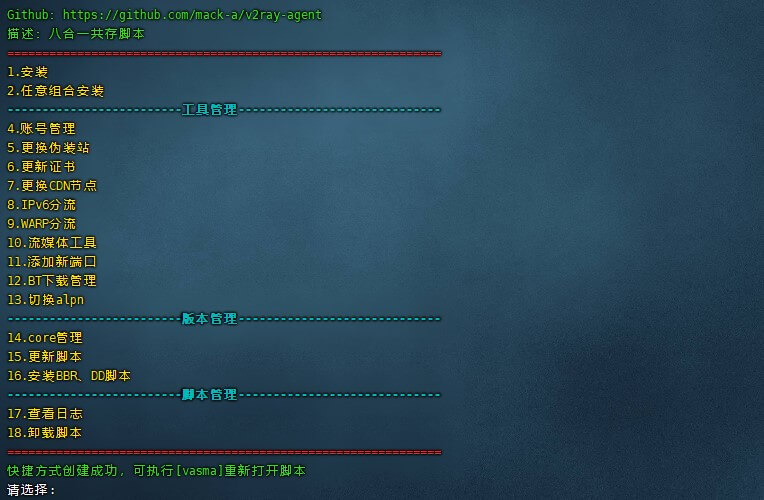
26、Typecho开启HTTPS后无法登录后台及评论
① 后台无法登录(在配置文件 config.inc.php 中加入如下一行)
define('__TYPECHO_SECURE__',true); //开启https② 用户无法评论(找到主题内的评论文件,一般是 comments.php ,在里面搜索 $this->commentUrl() 并修改为如下
echo str_replace("http","https",$this->commentUrl());27、V2board 后端对接 soga 部署脚本
bash <(curl -Ls https://blog.sprov.xyz/soga.sh)
或
bash <(curl -Ls https://raw.githubusercontent.com/sprov065/soga/master/install.sh)
vi soga/soga.conf 进入配置
28、网站底部添加访量、阅读次数、在线人数、响应时间

① 显示访问次数、访问总量(代码放置在 主题目录下:footer.php 放在合适的位置)
<script async src="https://api.ly522.com/js/jilei.pure.mini.js"></script>
<span id="jilei_container_site_pv">本站总访问量<span id="jilei_value_site_pv"></span>次</span>
<span class="post-meta-divider">|</span>
<span id="jilei_container_site_uv">本站访客数<span id="jilei_value_site_uv"></span>人</span></p>
② 显示响应时间、在线人数
在functions.php添加以下内容
//在线人数
function online_users() {
    $filename='online.txt'; //数据文件
    $cookiename='Nanlon_OnLineCount'; //Cookie名称
    $onlinetime=30; //在线有效时间
    $online=file($filename);
    $nowtime=$_SERVER['REQUEST_TIME'];
    $nowonline=array();
    foreach($online as $line){
        $row=explode('|',$line);
        $sesstime=trim($row[1]);
        if(($nowtime - $sesstime)<=$onlinetime){
            $nowonline[$row[0]]=$sesstime;
        }
    }
    if(isset($_COOKIE[$cookiename])){
        $uid=$_COOKIE[$cookiename];
    }else{
        $vid=0;
        do{
            $vid++;
            $uid='U'.$vid;
        }while(array_key_exists($uid,$nowonline));
        setcookie($cookiename,$uid);
    }
    $nowonline[$uid]=$nowtime;
    $total_online=count($nowonline);
    if($fp=@fopen($filename,'w')){
        if(flock($fp,LOCK_EX)){
            rewind($fp);
            foreach($nowonline as $fuid=>$ftime){
                $fline=$fuid.'|'.$ftime."\n";
                @fputs($fp,$fline);
            }
            flock($fp,LOCK_UN);
            fclose($fp);
        }
    }
    echo "$total_online";
}

/**
 * 加载时间             以下为添加内容
 * @return bool
 */
function timer_start() {
    global $timestart;
    $mtime     = explode( ' ', microtime() );
    $timestart = $mtime[1] + $mtime[0];
    return true;
}
timer_start();
function timer_stop( $display = 0, $precision = 3) {
    global $timestart, $timeend;
    $mtime     = explode( ' ', microtime() );
    $timeend   = $mtime[1] + $mtime[0];
    $timetotal = number_format( $timeend - $timestart, $precision );
    $r         = $timetotal < 1 ? $timetotal * 1000 . " ms" : $timetotal . " s";
    if ( $display ) {
        echo $r;
    }
    return $r;
}
在 footer.php 添加以下内容
<span>加载耗时:<?php echo timer_stop();?></span>
<span>在线人数: <?php echo online_users() ?>人</span>29、Linux放行端口
Debian/Ubuntu
安装iptables(通常系统都会自带,如果没有就需要安装)
apt-get update
apt-get install iptables

例如要放行8888端口
iptables -I INPUT -p tcp --dport 8888 -j ACCEPT

保存放行规则
iptables-save

安装iptables-persistent(设置持续生效规则)
apt-get install iptables-persistent

保存规则持续生效
netfilter-persistent save
netfilter-persistent reload
Centos 放行端口
例如要放行8888端口
firewall-cmd --zone=public --add-port=8888/tcp --permanent

命令含义:
--zone                      #作用域
--add-port=80/tcp  #添加端口,格式为:端口/通讯协议
--permanent           #永久生效,没有此参数重启后失效

重启防火墙
firewall-cmd --reload
查看防火墙规则
iptables -L
30、Linux 桌面化安装脚本(Ubuntu/Debian 需要至少1.0 GB内存;CentOS需要至少1.5 GB内存)
wget https://raw.githubusercontent.com/Har-Kuun/OneClickDesktop/master/OneClickDesktop_zh-CN.sh && sudo bash OneClickDesktop_zh-CN.sh项目地址:https://github.com/Har-Kuun/OneClickDesktop
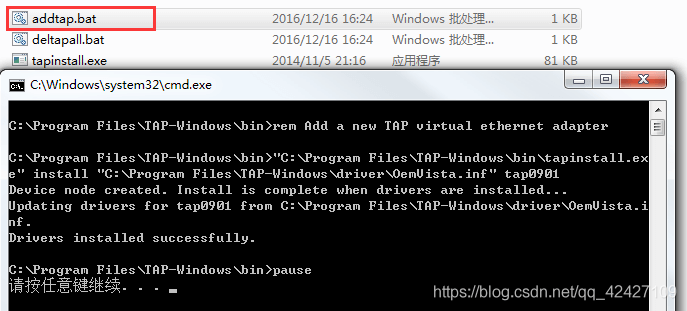
31、Windows下设置openvpn多连接
win+R 调出运行,输入以下路径,回车
C:\Program Files\TAP-Windows\bin双击以下文件,会自动添加一块虚拟网卡,如果自己的用户不是 Administrator,需要以管理员身份去运行,否则会添加失败
 配置多网卡后 就可以进行多连接。
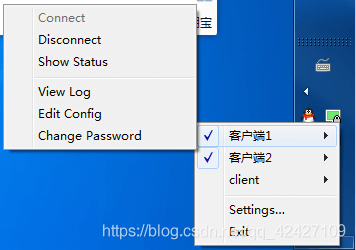
32、Cloudreve重置密码
./cloudreve --database-script ResetAdminPassword33、
当前文章地址:https://www.day0.club/566/%e4%b8%aa%e4%ba%ba%e7%ac%94%e8%ae%b0/
来源:DAY·0驾校
文章版权归作者所有,未经允许请勿转载。


共有 0 条评论